Man, I gotta tell you, setting up this new website for the local water sports crew was a headache right from the start. We needed the “Canal Sport 1” logo front and center, big and crisp. The old guy who handled the files before me just dumped a folder on my desktop. I grabbed the logo file, tossed it up on the site banner, and instantly, my eyes started bleeding. It looked like garbage. All fuzzy edges, muddy colors. It was a JPEG, of course.
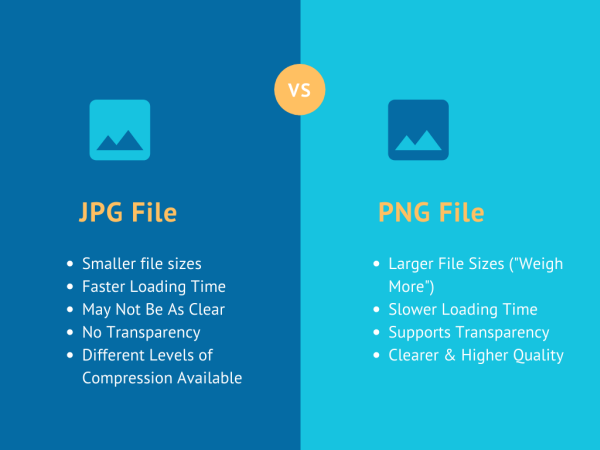
I spent a good hour just trying to fix that miserable file, thinking it was my fault. I figured maybe the compression was too high. I dragged that original file into my editing software—you know, the cheap one I use—and cranked up the quality setting to 95%. I hit save. The file size ballooned, which was annoying, but I thought the quality would be perfect. Nope. I zoomed way in on the screen, maybe 400%, and those little blocky squares—the artifacts—were still there, especially around the sharp edges of the text and that little boat graphic in the corner. JPEGs are made for photos, right? They blend colors nicely. But logos? They have sharp, defined lines. JPEG just murders them.
The Pivot to PNG: Setting up the Comparison
I scratched my head for a minute. Wait, why am I even using JPEG? I remembered hearing some old tech head saying that PNG was the ticket for anything with clear lines and maybe some transparency. I went digging through the club archives and, thankfully, someone had saved the original source file—luckily an Illustrator file from like ten years ago. I opened it up and exported two new versions right next to each other to really compare them side-by-side on my desktop. This wasn’t going to be a guess; I needed proof for the committee that we were using the wrong format.
- Test 1: JPEG, saved at 100% Quality, baseline format.
- Test 2: PNG-24 (the good one), maximum quality, transparency enabled.
I uploaded both to a test page, overlaying them onto a slightly colored background so I could really see what was going on. The difference was immediate and shocking. I should have done this months ago.
The Nitty Gritty Detail: Where PNG Crushed JPEG
First thing I noticed was the edges. With the PNG, those letters in ‘Canal Sport 1’ were razor-sharp. You could zoom in until your nose touched the screen and they stayed perfect. No muddy blend of colors trying to smooth out a curve that shouldn’t be smooth. The PNG kept the lines clean because it compresses without losing that sharp detail, which is exactly what a hard-edged, vector-based logo needs.
Then there was the color fidelity. Our logo uses just three specific, defined colors. JPEG tended to mess with those solid color blocks, adding tiny variations and noise inside the block itself, making the solid blue look textured when it shouldn’t. PNG kept the colors uniform and solid. It looked punchy and clean, exactly how the brand guide said it should look. It just understood that a block of color should stay one color, end of story.

I also played around with putting the logo over a slightly textured background on the website, which was a requirement for the new design. The old JPEG always needed a white box around it, or if I tried to crop it tightly, the edges still looked terrible. The PNG? Since it handles transparency natively, I exported a version with no background, and it just floated perfectly on the texture. That’s something JPEG just can’t touch without major hassle, and for a logo that has to look good everywhere—on banners, shirts, and screens—transparency is key.
The File Size Surprise
Now, usually people complain that PNG files are massive. And yeah, if you’re saving a high-detail photograph of a sunset, a PNG can be huge compared to a JPEG because it retains so much detail. But for a simple logo like this, which is mostly solid blocks of color and sharp text? The difference wasn’t even that bad, and in my specific case, the PNG actually won.
The 100% quality JPEG I made—the blurry one—was 180KB. The high-quality, transparent PNG was only 145KB. For a clean graphic, PNG actually crushed the file size too, because it handles those solid blocks of color much more efficiently than JPEG does its blurry, blending work. I realized that the compression algorithm for PNG is just smarter for this kind of image.
Why This Logo Obsession Started
Why did I dive so deep into something so small that many people would just ignore? Well, this whole thing came up right before the big regional regatta. We were printing new banners for the sponsorship wall, right? And I got stuck handling the print files because the usual guy was out sick. The printing company sent back a proof using the old JPEG file that they just scaled up. It looked horrific—like a watercolor painting that had been left in the rain. They charged us extra because they had to try and manually clean up the blurry edges for high-resolution printing.
I complained to the committee about the extra cost. They told me, flat out, “It’s your job to provide the right file!” I felt so dumb paying extra money just because some past volunteer didn’t understand file formats. That whole argument made me realize that I needed to lock down the perfect version of that logo, in the perfect format, so we never wasted money or looked amateurish again. I created a master folder now, strictly labeled ‘PNG ONLY’ for anything related to the logo. It was a painful, small lesson, but I learned it hard, and I’m not making that mistake twice. Use PNG for logos. Period.