
The Day I Needed Serious Juice for the Garage
Man, I finally bought the air compressor I’ve been eyeing up for two years. This thing is a beast. But when I dragged it into the garage, I remembered the problem: it needed 240 volts. Everything in my shop was standard 120V, run off some crummy old wiring the previous owner installed. I had to step up my game. This wasn’t just swapping out a standard wall socket; this was running proper split-phase power. It felt like a big job, but honestly, once you respect the power, it’s pretty straightforward.
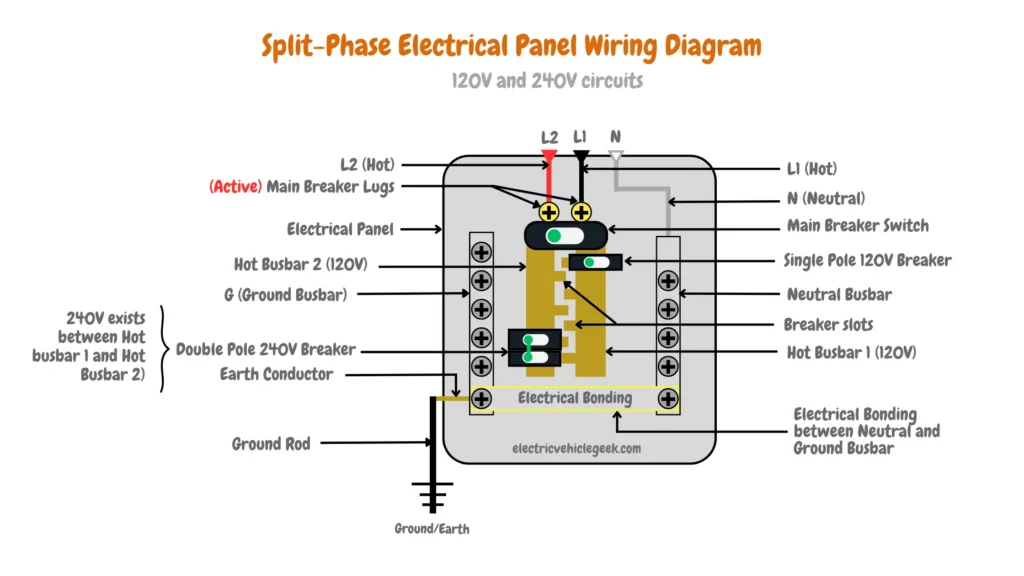
First things first. You gotta treat electricity like a hungry snake. You don’t mess with it until you know it’s completely asleep. I marched straight to the main panel. Don’t bother with the switch near the wall. That only controls the lights sometimes. I had to find the dedicated double-pole breaker I had already installed for this run—the one feeding the new heavy-duty wire into the garage. I mean it, flip that thing off. I didn’t just flip it; I yanked the cover off the panel, grabbed my voltage tester, and stuck those probes right onto the terminals just to be absolutely, positively sure the circuit was dead. Don’t trust the click. Test everything twice.
Opening Up the Box and Recognizing the Wires
The cable I ran was standard 10-gauge, four-conductor stuff—heavy duty for the appliance I planned to plug in. When I peeled back the sheathing inside the junction box, I was staring at the four colors that make up split-phase magic: Black, Red, White, and Bare Copper.
This is where folks get confused about 240V wiring. For a simple 120V plug, you get one hot wire (usually black), a neutral (white), and a ground (bare). But for split-phase, you get two hot legs, each 120 volts, but 180 degrees out of phase. That’s why you need the black wire and the red wire.
I grabbed the new receptacle—it was a NEMA 14-30R, the typical four-prong monster. Now, attaching the wires seemed complicated, but the terminals tell you exactly what goes where. I remember staring at the back of the plug for a good minute just reading the labels to make sure I didn’t mix up L1 and Neutral. That’s a mistake that ends with a loud bang and a trip to the hardware store for a new outlet, or worse, the ER.
- The Bare Copper Wire: This one is easy. It’s always ground. I secured the bare copper wire to the green grounding screw terminal. You tighten it down until it feels solid. This is your safety lifeline.
- The Hot Wires (L1 and L2): These are your power carriers, the Black and the Red. I took the black wire and screwed it tightly onto one brass terminal (L1) and then took the red wire and screwed it onto the other brass terminal (L2). These two together give you the full 240 volts needed to run the compressor.
- The Neutral Wire: This is the White wire. On a lot of pure 240V appliances (like some heaters), you don’t even use the neutral, but my NEMA 14-30R outlet had a neutral slot for potential future use or if I ever swapped in an appliance that needed 120V alongside 240V. I attached the white neutral wire to the silver terminal.
The Jiggle Test and the Moment of Truth
Once everything was connected, the physical process of shoving those stiff 10-gauge wires back into the box was a nightmare. They barely bent. I really had to muscle them in without creating a loose connection at the terminals. After I got the receptacle plate screwed on tight, I did the “jiggle test”—I gently tugged on each wire coming out of the back to make sure nothing had come loose while I was cramming the wires into the wall. If a wire moves, you haven’t tightened the screw enough, and that’s how fires start, man.

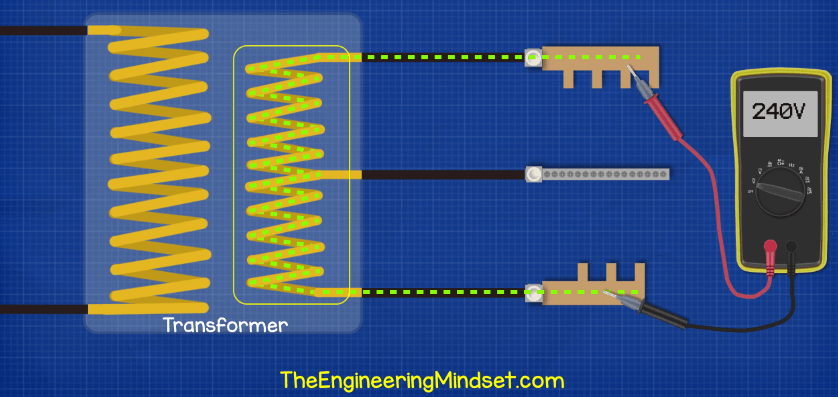
Then came the moment of truth. I walked back to the main panel, took a deep breath, and flipped the double-pole breaker back on. No sparking, no smoke, just a satisfying click. Back in the garage, I plugged in my multimeter, set it to AC voltage, and checked my connections:
Between Black (L1) and Red (L2): 240 Volts. Perfect.
Between Black (L1) and White (Neutral): 120 Volts. Perfect.
It worked. I plugged in the new compressor, and it roared to life louder and faster than anything I’d ever owned. It was pure satisfaction, the kind you only get when you DIY something that involves danger and physics.
Why I Take This Stuff Seriously
I know I talk about this stuff casually now, but there’s a reason I follow every safety step religiously. Back when I was first learning this kind of work, maybe twenty years ago, I didn’t respect the main breaker. I was swapping out a simple light fixture in the kitchen, and I thought flipping the wall switch was enough. It was 120V, but when my knuckles accidentally brushed the hot wire against the metal box, the flash of light and the buzzing I felt up my arm scared the heck out of me. I ripped my hand back so fast I twisted my wrist. It was just a second, but it taught me that electricity isn’t just a force; it’s a threat if you treat it carelessly.
That little mistake cost me nothing but an adrenaline spike and a mild sprain, but it permanently wired my brain to prioritize testing the circuit, even for the smallest job. So, yeah, when I wire up a big 240V split-phase plug for a massive tool, I’m not taking any chances. You should never skip those crucial steps, no matter how confident you feel. Confidence doesn’t stop the current. Testing does.