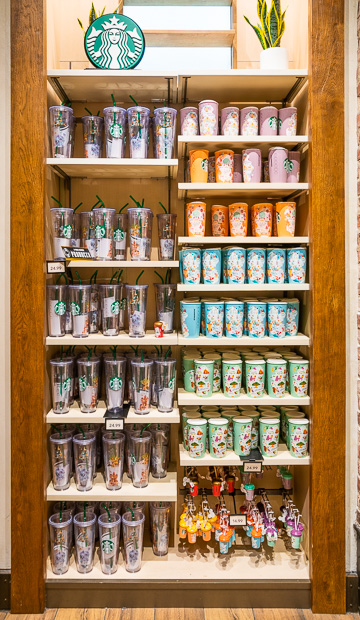
Man, if you’re like me, you started off with one or two of those colorful Disney World “You Are Here” or “Been There” Starbucks mugs. Cute, right? Then you go back, maybe your kids start collecting them too, and suddenly you look around and realize your kitchen looks like the gift shop exploded. I swear, I hit critical mass about six months ago. We had seventy-three of these damn things.

My wife—God bless her patience—finally drew a line in the sand. “Either these are going in the basement, or they’re going on eBay,” she told me, dead serious. I wasn’t about to box up my hard-earned collection just because we ran out of space above the stove. I needed a solution that made them look intentional, not just accidental clutter. Displaying them was the only option, but doing it right meant getting them out of the open air. Dust, man. The constant dusting was killing me.
Choosing the Battleground: Display vs. Storage
First thing I threw out the window was the basic floating shelf idea. Tried that already. Looked messy, collected dust like a magnet, and didn’t utilize vertical space efficiently. I spent a weekend scrolling through Pinterest, looking at these complicated glass cabinet setups. Too expensive. I’m a practical guy; I want something robust that I can knock together with plywood and maybe a drill I found under the garage workbench.
The solution I landed on? Integrated wall niche shelving, sealed off with cheap acrylic doors, and backlit. Yeah, sounds fancy, but the execution was pure brute force DIY. I eyed up a completely useless, shallow linen closet nook we had built next to the pantry. It was just gathering junk—old phone chargers, expired spices. Perfect candidate for demolition.
I grabbed the tape measure and determined the opening was about 30 inches wide and 7 feet tall. Enough space to stack six or seven shelves high, maximizing that vertical real estate. I needed to build a fully enclosed shelving unit that sat flush inside that niche.
The Execution: Plywood, Paint, and Panic
My first practical step was ripping out the old trim. I mean, tearing it out violently. I used a crowbar and managed to gouge the drywall a little, but nothing a bit of spackle wouldn’t hide later. I measured the depth of the niche—only 10 inches deep. Perfect for those oversized mugs.

I headed straight to the lumber yard. I didn’t mess around with fancy hardwood; I bought two sheets of simple, smooth 3/4-inch birch plywood. That stuff is sturdy and takes paint well enough. I spent the rest of the day cutting the main structure pieces using my old circular saw. I cut:
- Two long side pieces (7 ft x 10 in)
- One top piece, one bottom piece (30 in x 10 in)
- Seven shelf pieces (28.5 in x 9 in – accounting for the plywood thickness)
I screwed the frame together using pocket screws on the inside edges because I didn’t want any hardware showing on the outside. This part was a pain. Trying to wrangle seven feet of plywood structure while making sure everything was square required me bribing my teenage son with McDonald’s just to hold one end steady.
Once the box was assembled, I installed the shelves. I didn’t trust flimsy shelf pins. I marked the shelf heights—making sure the tallest mug (the huge ceramic holiday one) had plenty of clearance—and then permanently screwed each shelf into the side walls. Rock solid.
Adding the Bling: Lights and Doors
This is where the display part really kicks in. Plain brown mugs look boring. Lit up, they look like collectibles. I bought a 30-foot spool of cheap, adhesive LED strip lights from Amazon—the kind you use for under-cabinet lighting. I ran the strips horizontally just under the front lip of each shelf. I drilled a tiny hole through the back corner of each shelf to snake the wire down to the power source hidden at the very bottom.
It was fiddly work. Those adhesive backs are terrible, so I ended up using tiny staples to hold the wire in place. I had to make sure the wiring harness and power brick were entirely concealed behind the bottom plywood panel, so the whole thing looked clean when it was installed.

The final hurdle was the door. Remember, I needed to keep the dust out. Custom glass was way out of budget. So, I built a simple frame out of 1×2 lumber, painted it black, and then screwed sheets of clear acrylic (Plexiglass) right onto the back of the frame. Plexiglass is cheap, light, and easy to drill through. I hung the entire door frame using simple offset hinges—the kind that let the door open wide without interfering with the shelf edges.
The Reveal and the Win
Installing the finished unit into the niche was the final struggle. It was heavy. My son earned his McDonald’s again. We had to lift it, slide it in, and then screw it permanently into the wall studs inside the niche opening. Took maybe an hour of grunting and minor swearing.
I loaded all seventy-three cups onto the shelves. I stood back, flipped the light switch, and BAM. Instant gallery. Those lights hit the colors and the relief patterns perfectly. The sealed acrylic door meant no more fighting dust bunnies. The collection was displayed, it was protected, and most importantly, it was entirely off the counter space.
My wife walked by, looked at it, and just nodded. That’s high praise in my house. Sometimes, you just gotta stop talking about the clutter and start drilling holes into the wall to solve the damn problem.
